With NordVPN’s blazing fast speeds and a list of privacy protecting features it’s no wonder why it’s one of the most popular VPN services. One feature that we think is super important is NordVPN’s Kill Switch. This kill switch helps protect your privacy in the event that connection to the VPN is lost. In this article, we’ll take a look at what a Kill Switch is and how to enable it in NordVPN on various devices.
What is a VPN Kill Switch?
VPNs keep your internet traffic private while you are connected to the service, but what happens if your connection to the VPN suddenly drops? Without a kill switch, you might accidentally be exposing sensitive data in the time that you’re no longer connected.
A VPN kill switch serves as a last line of defense for your data. It constantly monitors your connectivity to the VPN and automatically blocks your web access if this connection is severed.
This quick acting feature prevents your private data from being exposed if you unknowingly lose connection to the VPN.
How to Enable the NordVPN Kill Switch
Windows
The Windows version of NordVPN’s kill switch can function in either Internet Kill Switch or App Kill Switch mode. The first method will disable all internet access for your device if a loss in connection occurs. The second method allows you to specify certain apps that should close if connection to the VPN is lost.
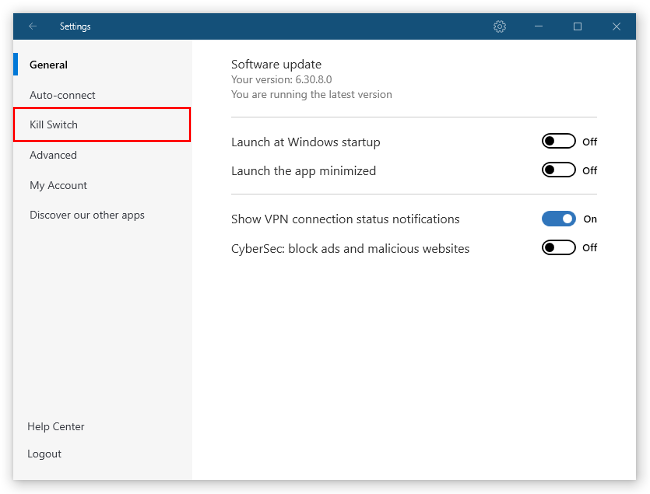
Step 1: Open the NordVPN client and login if prompted
Step 2: Click the Gear icon at the upper right corner of the client to open settings
Step 3: Click Kill Switch at the left of the settings screen
Step 4: Enable either Internet Kill Switch or App Kill Switch
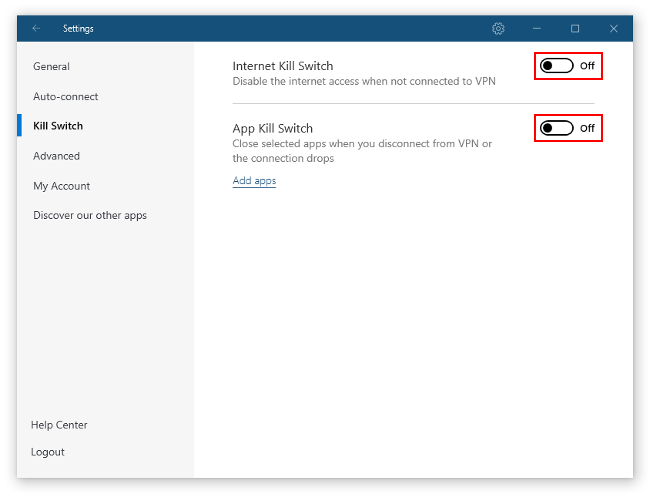
If you select App Kill Switch make sure you add the apps you wish to close by clicking Add apps.
Android / iPhone
Android
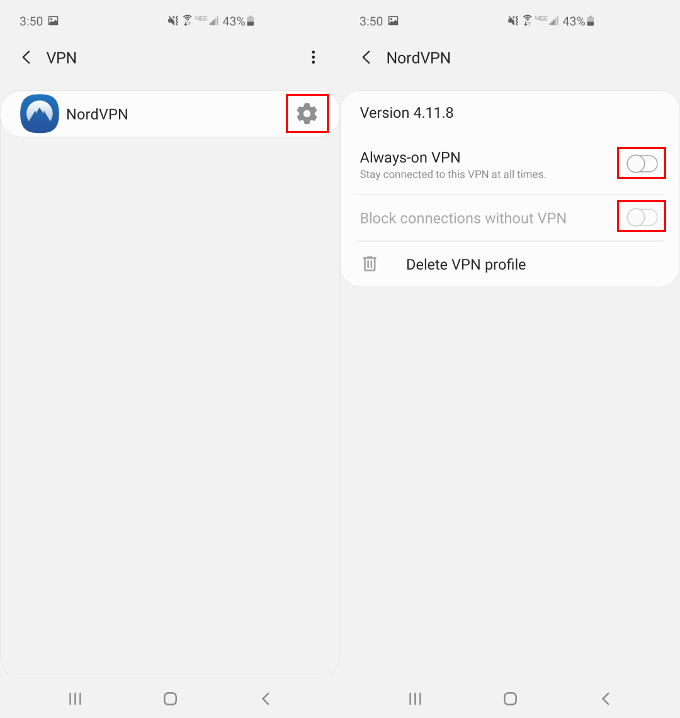
The Android kill switch is a system wide block that disables all internet access if you lose connection to the VPN. You’ll have to enable the option first though.
Note: You need to have made at least one connection to NordVPN for the profile where you enable Always-on VPN to show up.
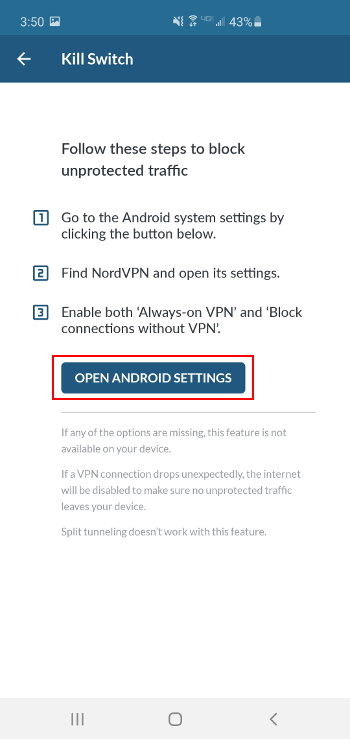
Step 1: Open the NordVPN App and tap the Gear icon at the upper left corner
Step 2: Scroll down to the Advanced section and tap Kill Switch

Step 3: Tap the Open Android Settings button
Step 4: Tap the Gear icon next to NordVPN and enable Always-on VPN AND Block connections without VPN
iPhone
The Kill Switch on iPhone works similar to how it functions on Android. It’s a system wide internet block if you lose connection to the VPN. It is a bit easier to enable though.
Step 1: Open the NordVPN App and tap the Settings icon at the upper left corner
Step 2: Scroll down to My Settings and tap the toggle to the right of Kill Switch to enable it
Linux
Linux users can enable the NordVPN Kill Switch via the terminal. Simply type nordvpn set killswitch on in the Linux terminal to enable the Kill Switch. Typing nordvpn set killswitch off will disable it.
The Kill Switch in the Linux version of NordVPN is also system wide.


And how does one do tis on Mac?