
Server Message Block (SMB) is a file sharing protocol that allows computer applications to read and write files and access other system resources of networked devices. Windows uses the SMB protocol for sharing files with other devices on your network, specifically with non-Windows systems.
SMB was originally known as CIFS (Common Internet File System), which we now refer to as SMBv1. SMBv1/CIFS was decommissioned due to being inefficient and containing severe security vulnerabilities.
Windows used the SMBv1 protocol up until Windows Vista, where it began utilizing SMBv2. Modern versions of Windows, like Windows 10, use SMBv2 or SMBv3. In a security update to Windows 10, Microsoft disabled SMBv1 by default.
Generally SMB (v2/v3) is already enabled in Windows 10, so you don’t need to manually enable it. If you want to double check, or need to enable SMBv1 for legacy application support, then continue reading to find out how.
How to Enable, Disable, and Check for SMB in Windows 10
Microsoft introduced a handy Windows PowerShell cmdlet in Windows 8 and Windows Server 2012 that allows you to enable, disable, or check for SMB. Note that Windows 10 uses SMBv3, but uses the same EnableSMB2Protocol cmdlet to enable/disable it.
To check which version of SMB is currently running in Windows 10, open Windows PowerShell and run the following commands:
Get-SmbServerConfiguration | Select EnableSMB1Protocol
Get-SmbServerConfiguration | Select EnableSMB2Protocol
These commands will return true or false indicating whether SMBv1 or SMBv2/3 is currently running on the system, respectively:
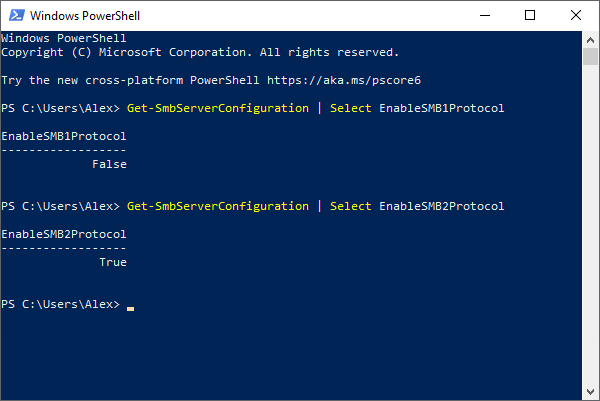
The photo above shows a system where SMBv2/3 is running and SMBv1 is not.
To enable or disable SMBv2/3 in Windows 10, run the following commands in Windows PowerShell:
Enable
Set-SmbServerConfiguration -EnableSMB2Protocol $true
Disable
Set-SmbServerConfiguration -EnableSMB2Protocol $false
Disabling SMBv2/3 in Windows 10 disables a lot of other Windows functionality and Microsoft recommends you only do so for troubleshooting purposes.
How to Enable SMBv1 in Windows 10
SMBv1 is disabled in Windows 10 by default, but you can (dangerously) enable it through Windows Features.
Microsoft strongly recommends you don’t enable SMBv1 in Windows 10. If you’re not convinced yet, then consider this quote from Microsoft’s Stop using SMB1 support article:
The original SMB1 protocol is nearly 30 years old , and like much of the software made in the 80’s, it was designed for a world that no longer exists. A world without malicious actors, without vast sets of important data, without near-universal computer usage. Frankly, its naivete is staggering when viewed though modern eyes.
Ned Pyle
If you must enable SMBv1 in Windows 10, for legacy application support, you can do so using the following method:
- Hit
Windows key + Ron your keyboard to open the Windows Run dialog box. - Type in
optionalfeaturesand clickOK, or hitEnteron your keyboard. Alternatively, you can go to Windows Settings > Apps > Optional features > More Windows features (at the bottom).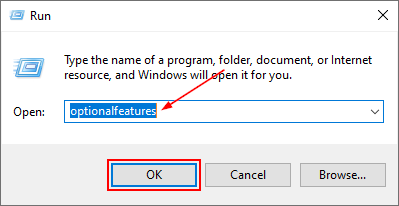
- in the
Windows Featureswindow that appears, Check the box to the left ofSMB 1.0/CIFS File Sharing Supportand then clickOK.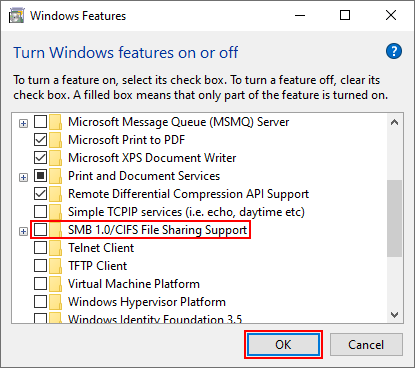
- Restart the computer and SMBv1 will now be running.
Alternatively, you can open Windows PowerShell and run the following command:
Set-SmbServerConfiguration -EnableSMB1Protocol $true
Final Thoughts
Microsoft is making great strides when it comes to securing Windows systems through updates like disabling SMBv1 and Reputation Based Protection. If you must enable SMBv1 in your Windows environment, it’s important to plan upgrades that ensure it’s only temporary.


")
